Wireguard
I'm working on the basis that you know how to connect to a headless pi and can manage basic command line Linux. If not there are plenty of examples online which will get you up to speed.
Wireguard is a relatively new VPN (stable release March 2020) which aims to be simple secure and effective. I'm a big fan and I'm briefly going to go over a basic setup before going into more complex set-ups in future.
The raspberry pi is a good starter/testing box so this is going to be my base (running bullseye), and I'm going to connect using a laptop (also running bullseye) and a phone (Lineage using the wireguard android app). These steps should be relatively easy to adapt for other versions of Linux and the IOS app I believe is similar to android. As for windows, I understand that there's a serviceable GUI but you're on your own there I'm afraid.
Ok got your fresh new pi? Great! Fiddle with users, security etc, make sure you can ssh into it and you're ready to go.
Connect to the pi, then as we've a lot of commands requiring root lets switch
sudo su
Then make sure we're up to date and install wireguard
apt update && apt upgrade -y && apt install wireguard -y
Now that wireguard is installed we're going to generate some keys as root so lets switch directory
cd /etc/wireguard
30 second explanation on public key crypto. You create keys in pairs, one public key, one private key. The private key is private, you don't give it to anyone else. The public key you can make available publicly.
Think of it like creating a padlock (public key) and a key (the private key) that opens the padlock. I keep the key, and I give the padlock to someone. They lock a box with the padlock, and now only I can open it as only I have the key in my possession. I can give everyone copies of this padlock, everyone in the world can duplicate it for all I care, but only I have a copy of the key as I (hopefully) didn't let anyone see my key. If anyone did get hold of my key then they can now unlock all the locks (which would be bad).
So what does this mean for wireguard? Well both "ends" of the connection are going to create a public key and a private key, then they're going to swap public keys allowing each other "entry". We do this using the following command
wg genkey | tee wg0.conf | wg pubkey >> wg0.conf
Breaking this down the first chunk generates a private key to standard output, we then pipe this to the tee command to add it to our config file but also pass it on to be piped to our public key generation before finally appending our public key to the same configuration file. At the end of this we end up with our config file containing two incomprehensible lines like this:
uBhOrPMSrfbazR9BGj+Vi4a+J9O8ka96b6zgI6bbDWo=
Oq+Nh1/C8GD3YlgSRloMd7x8w7QKLJfjjFePZQR3/DE=
Lets open it with vim (or your preferred editor of choice) and make a few changes
[Interface]
PrivateKey = uBhOrPMSrfbazR9BGj+Vi4a+J9O8ka96b6zgI6bbDWo=
#PublicKey = Oq+Nh1/C8GD3YlgSRloMd7x8w7QKLJfjjFePZQR3/DE=
Address = 10.6.0.1/24
ListenPort = 11945
Wat?
First line we're telling wireguard that everything that follows is an interface. An interface is the point of connection between our computer and a network. For example on linux you can type "ip link" to see the network interfaces. Here we're defining a new one wg0 which is going to connect to the other end(s) of our VPN.
Second line was our private key we generated, we've just told wireguard what it is now.
Third line is our public key which we've commented out. This is not needed as part of the configuration, but I like to have it here for easy access.
Fourth line is the IP address used by our pi on the virtual private network we're creating.
Fifth line is the port which we want wireguard to listen on, this is 11945 by default but can be changed for obscurity or in certain cases where ports are blocked.
So
lets circle back to line 4. Depending on your networking background this is where things get tricky. The internet (IPv4) is made up of blocks of addresses that look like this (4 numbers with decimals between them). When you navigate to a website like www.google.com you're actually navigating to an address. If you go to a lookup site such as whois.domaintools.com you can look up the IP address, and if you type the address directly it will take you to the page in question (unless they have rules in place to require domain names, but that's another story). Now the thing is that all of the computers attached to your router also need addresses, but we also can't go around assigning every single person's computer a distinct IP address. So what happens is that we have private address spaces which everyone uses for private networks (local networks). Confused yet? Ok so lets log into the router and take a look.

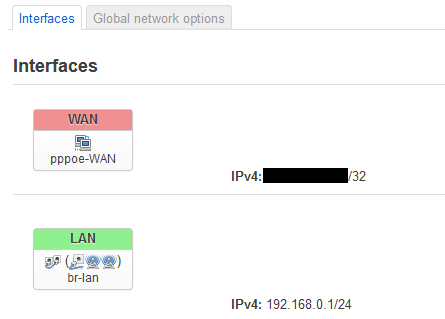
Here you can see the router has two interfaces Wide Area Network (everything "outside" the house) and Local Area Network (everything inside the house). The IPV4 address for WAN is the address seen by a website when I connect to it, and the address that everyone outside uses to connect to me (this is why it is censored). The IPV4 address for the LAN on the other hand is the address used by devices inside the house to connect to the router (in this case 192.168.0.1). This IP is part of the private address space and it's only going to reach my router when inside my network. If you try to connect to 192.168.0.1 you're going to end up connected to your router (assuming that it is not using 192.168.1.1 or some other private address space IP).
So what does this have to do with wireguard? Well at the moment let's assume our pi only has the one interface which we're using to connect to the local network. If we want to connect to an address outside the local network our pi connects to the router which then passes on our request to the outside world. Now imagine that we connect our pi to the neighbours WiFi (you should probably ask first) at the same time as having it connected to our home network. Now we have two interfaces (we're hand waving away IP conflicts and other potential issues). So I use the first interface to go to icanhazip.com. The pi contacts the router and the router passes on our request, icanhazip.com sees the (external) IP address from our router. Now I do the same thing, but I use the other interface, so this time icanhazip.com sees the IP address from the neighbour's router.
The VPN we are setting up works in much the same way. Our LAN (a private network) is using addresses from 192.168.0.0 all the way up to 192.168.0.255 so we need another set of addresses to use that are private addresses with no collision. I've chosen to use 10.6.0.0 - 10.6.0.255 but you can pick others (see wikipedia for more options).
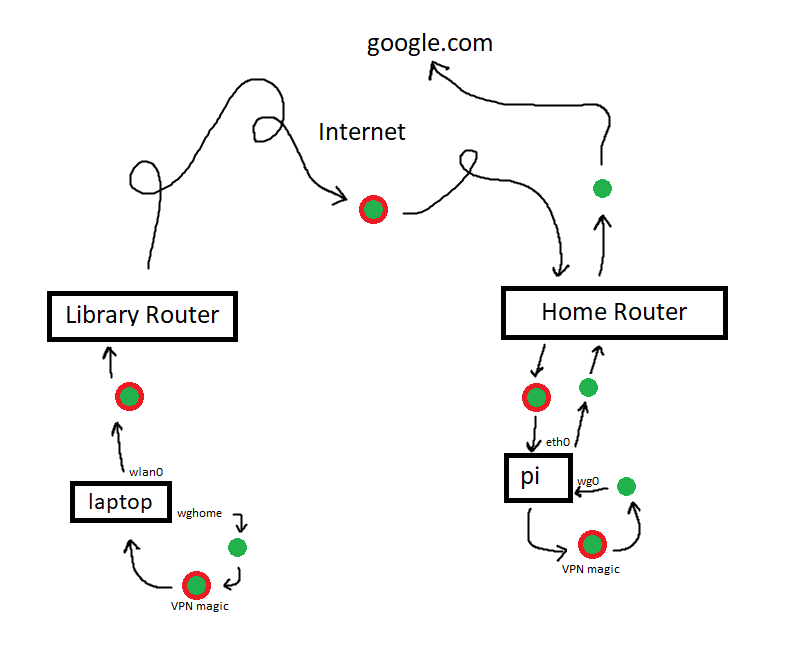
Now it's all very well making this new private network, but my neighbour's router is maybe 15m away at most and I can only just manage to connect, so how do I manage to have a private network that works from another city or another country? Well this is why it's a virtual private network, it's not bothered about physical geography, and it works a little like this:
- Fire up the VPN on our laptop at our local library
- Request google.com
- Request hits wg0 (our VPN interface)
- Wireguard wraps our request in VPN magic (not strictly accurate)
- Ball of VPN magic exits out of our "normal" interface, gets passed on to the library's router
- Ping pongs over the internet to our home router
- Home router passes it to the pi
- Enters the pi via the VPN interface
- Wireguard on the pi unwraps the VPN magic revealing the original request
- Original request is disguised to look like it originated from the pi and then sent to the router by the pi
- Request carried out as normal
- Entire thing carried out in reverse so that the response can be sent to the laptop
And Now In Paint

Hello from the other side
Now to get things going we're going to need the other end of this connection. So let's fire up the laptop, and follow the same install procedure for wireguard as above. Once that's done we're going to navigate to /etc/wireguard again as root, but this time on the laptop, and we're going to call our config file wghome.conf this time around.
wg genkey | tee wghome.conf | wg pubkey >> wghome.conf
Edit the file again, but ignore the listening port this time and you'll end up with something like this:
[Interface]
PrivateKey = yLj/lbMqSaeY/M/l/LmvaepchKPZSisbCvs67yxkRm8=
#PublicKey = h8/xa+2AAdu2/a+4dk73ssxPH65I9Oxe70EZcEemoFk=
Address = 10.6.0.2/24
Now both sides of our VPN have a public key and a private key, along with a defined IP address on the private network we're creating. We now need to make sure each side has the other's public key, define what traffic should be sent over the VPN, and in the case of our laptop also define how it will connect to the pi.
[Interface]
PrivateKey = yLj/lbMqSaeY/M/l/LmvaepchKPZSisbCvs67yxkRm8=
#PublicKey = h8/xa+2AAdu2/a+4dk73ssxPH65I9Oxe70EZcEemoFk=
Address = 10.6.0.2/24
[Peer]
PublicKey = Oq+Nh1/C8GD3YlgSRloMd7x8w7QKLJfjjFePZQR3/DE=
Endpoint = <PUBLIC IP OF PI HERE>:11945
AllowedIPs = 0.0.0.0/0, ::0/0
Here we have added the pi's public key in the first line for the peer. In the next line we have the public address we need to connect to (simplest method of obtaining it is likely to be running "curl icanhazip.com" on the pi) followed by a colon (:) and finally the port that we defined in the pi's configuration.
We're also going to add a pre-shared key as an extra layer of security by adding a pre-shared key (note we're making the permissions stricter so that only root can access the file)
chmod 600 /etc/wireguard/wghome.conf && wg genpsk >> /etc/wireguard/wghome.conf
Then open the file again to and update the config to use this preshared key value
[Interface]
PrivateKey = yLj/lbMqSaeY/M/l/LmvaepchKPZSisbCvs67yxkRm8=
#PublicKey = h8/xa+2AAdu2/a+4dk73ssxPH65I9Oxe70EZcEemoFk=
Address = 10.6.0.2/24
[Peer]
PublicKey = Oq+Nh1/C8GD3YlgSRloMd7x8w7QKLJfjjFePZQR3/DE=
Endpoint = <PUBLIC IP OF PI HERE>:11945
AllowedIPs = 0.0.0.0/0, ::0/0
PresharedKey = Ve20tWP6yy7ZXi3J8pJyPx085483h2m2ceJhr2DDRQI=
Return to the pi and update our /etc/wireguard/wg0.conf file to include the public and preshared key:
[Interface]
PrivateKey = uBhOrPMSrfbazR9BGj+Vi4a+J9O8ka96b6zgI6bbDWo=
#PublicKey = Oq+Nh1/C8GD3YlgSRloMd7x8w7QKLJfjjFePZQR3/DE=
Address = 10.6.0.1/24
ListenPort = 11945
[Peer]
PublicKey = h8/xa+2AAdu2/a+4dk73ssxPH65I9Oxe70EZcEemoFk=
PresharedKey = Ve20tWP6yy7ZXi3J8pJyPx085483h2m2ceJhr2DDRQI=
AllowedIPs = 10.6.0.3/32
We need to open the file /etc/sysctl.conf on the pi and uncomment the line net.ipv4.ip_forward=1 to allow our pi to forward the VPN traffic. Then log into the router and port forward external port 11945 to internal port 11945 on our Pi.
Finally we can bring up the wireguard interface on the pi using the command sudo wg-quick up wg0.conf and similarly on the laptop by replacing the config file name. Running curl icanhazip.com from the laptop should now return the public IP address of your home network.

